Using Slot in Salesforce - LWC
Slot is a placeholder for markup. When we want to pass a full markup to a child component from a parent component we can make use of Slots.
The basic use of Slot is reusability. Suppose we want to render a markup on certain condition with different html markups but we want to use the same child component for all the conditions, in this case we can simply pass the markup as slots in the child component.
To conclude , Slots are used for making our code reusable and flexible.
Now when you click on the "Show First Modal" button on above screen we will get first modal box as below.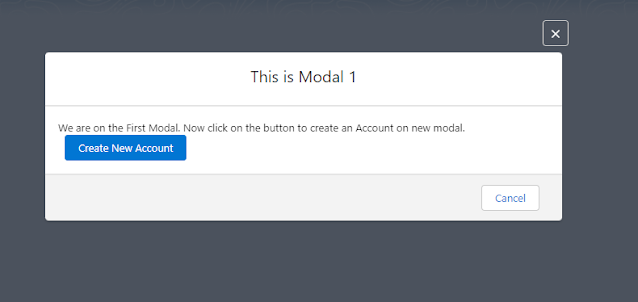

Code snippet:-
In the above code we can see that we are using same child component <c-generic-modal-pop-up>. We have used slots to pass content and header for the new Modal but this time we are not passing any footer as we already have two buttons from LDS <lightning-record-form>
Finally after saving the record in second screen we will get our third and final modal box.
Code snippet:-
Here, we are again passing all the three headers, content and footers. If we notice there is also a new slot tagline been passed.
Code :-
modalPopupExampleCmp.html
modalPopupExampleCmp.js
modalPopupExampleCmp.js-meta.xml
Generic Modal Pop up Component code
genericModalPopUp.html
genericModalPopUp.js
genericModalPopUp.js-meta.xml
So this is how we can create a reusable component using Slots and passing a markup .
Source code :- Git Hub
Resources:
Salesforce Documents -Slots
lwc-recipes
Thank you all !
#Keep learning #Keep Sharing :)
Recent blogs:
How to use hyperlink in custom Toast Notification message in LWC
Nested Accordion in LWC
Build custom add to favorites functionality using LWC
How to update Field Level Security in bulk ?
What is Slot ?
Slot is a placeholder for markup. When we want to pass a full markup to a child component from a parent component we can make use of Slots.
The basic use of Slot is reusability. Suppose we want to render a markup on certain condition with different html markups but we want to use the same child component for all the conditions, in this case we can simply pass the markup as slots in the child component.
To conclude , Slots are used for making our code reusable and flexible.
Implementation and Use Case:
In this example we will learn :-
So, to implement this we will Not write the modal box html markup again and again with different body and headers & footers. Instead we will use Slots and we will pass html markup and content body as needed.
In this example we will learn :-
- How we can create a generic or reusable Modal Box.
- How to use Slots to pass markup from parent to child component.
Let us take an example : -
We have a Parent component and a child component . This child component is a generic Modal box. Now we have a requirement to show the modal box on different conditions and from different places with custom headers and footers.So, to implement this we will Not write the modal box html markup again and again with different body and headers & footers. Instead we will use Slots and we will pass html markup and content body as needed.
The first screen has a simple button on clicking of this button our first Modal box will open.
Code snippet:- <lightning-card title="Generic Modal box using slot in LWC" icon-name="custom:custom101">
<br/>
<lightning-button variant="brand" label="Show First Modal" title="First Slot" onclick={openSlotModal}
class="slds-m-left_x-small slds-m-around_small"></lightning-button>
</lightning-card>
Code snippet :-In this we can see how we have used slot to pass header, content and footer respectively. In these div tag we can write our own markup as per need.
Now in the first modal we have another button to create a new Account. On click of this button we will get another modal to insert data to create a new account.
<c-generic-modal-pop-up data-modal-id="modalPopUp1">
<div slot="content">
We are on the First Modal.
Now click on the button to create an Account on new modal.
<lightning-button variant="brand" label="Create New Account" title="Slot Account" onclick={openSlotModal2}
class="slds-m-left_x-small"></lightning-button>
</div>
<div slot="footer">
<lightning-button label="Cancel" title="Cancel" onclick={closeAllModals} class="slds-m-left_x-small slds-m-around_small">
</lightning-button>
</div>
<div slot="header">
This is Modal 1
</div>
</c-generic-modal-pop-up>
Now in the first modal we have another button to create a new Account. On click of this button we will get another modal to insert data to create a new account.
<c-generic-modal-pop-up data-modal-id="modalPopUp2">
<div slot="content">
<lightning-record-form object-api-name="Account" fields={fields} onsuccess={handleSuccess}>
</lightning-record-form>
</div>
<div slot="header">
New Acccount(Modal 2)
</div>
</c-generic-modal-pop-up>
Finally after saving the record in second screen we will get our third and final modal box.
<c-generic-modal-pop-up data-modal-id="modalPopUp3">
<div slot="content">
<p>This is third modal from the same component to show the new account we created in modal 1.</p>
<div class="slds-p-bottom_large slds-p-left_large" style="width:500px">
<lightning-record-form object-api-name="Account" fields={fields} record-id={accountId} mode="readonly">
</lightning-record-form>
</div>
</div>
<div slot="tagline">
Displaying New Account
</div>
<div slot="footer">
<lightning-button label="Cancel" title="Cancel" onclick={closeAllModals} class="slds-m-left_x-small">
</lightning-button>
</div>
<div slot="header">
Show Account (Third Modal)
</div>
</c-generic-modal-pop-up>
<div slot="tagline">
Displaying New Account
</div>
Code :-
modalPopupExampleCmp.html
<template>
<lightning-card title="Generic Modal box using slot in LWC" icon-name="custom:custom101">
<br/>
<lightning-button variant="brand" label="Show First Modal" title="First Slot" onclick={openSlotModal}
class="slds-m-left_x-small slds-m-around_small"></lightning-button>
</lightning-card>
<c-generic-modal-pop-up data-modal-id="modalPopUp1">
<div slot="content">
We are on the First Modal.
Now click on the button to create an Account on new modal.
<lightning-button variant="brand" label="Create New Account" title="Slot Account" onclick={openSlotModal2}
class="slds-m-left_x-small"></lightning-button>
</div>
<div slot="footer">
<lightning-button label="Cancel" title="Cancel" onclick={closeAllModals} class="slds-m-left_x-small slds-m-around_small">
</lightning-button>
</div>
<div slot="header">
This is Modal 1
</div>
</c-generic-modal-pop-up>
<c-generic-modal-pop-up data-modal-id="modalPopUp2">
<div slot="content">
<lightning-record-form object-api-name="Account" fields={fields} onsuccess={handleSuccess}>
</lightning-record-form>
</div>
<div slot="header">
New Acccount(Modal 2)
</div>
</c-generic-modal-pop-up>
<c-generic-modal-pop-up data-modal-id="modalPopUp3">
<div slot="content">
<p>This is third modal from the same component to show the new account we created in modal 1.</p>
<div class="slds-p-bottom_large slds-p-left_large" style="width:500px">
<lightning-record-form object-api-name="Account" fields={fields} record-id={accountId} mode="readonly">
</lightning-record-form>
</div>
</div>
<div slot="tagline">
Displaying New Account
</div>
<div slot="footer">
<lightning-button label="Cancel" title="Cancel" onclick={closeAllModals} class="slds-m-left_x-small">
</lightning-button>
</div>
<div slot="header">
Show Account (Third Modal)
</div>
</c-generic-modal-pop-up>
</template>
import { LightningElement } from 'lwc';
import { ShowToastEvent } from 'lightning/platformShowToastEvent';
import NAME_FIELD from '@salesforce/schema/Account.Name';
import REVENUE_FIELD from '@salesforce/schema/Account.AnnualRevenue';
import INDUSTRY_FIELD from '@salesforce/schema/Account.Industry';
import ACTIVE from '@salesforce/schema/Account.Active__c';
export default class ModalPopupExampleCmp extends LightningElement {
accountId;
fields = [NAME_FIELD, REVENUE_FIELD, INDUSTRY_FIELD,ACTIVE];
openSlotModal() {
console.log('changed to modal');
const modal = this.template.querySelector('c-generic-modal-pop-up[data-modal-id=modalPopUp1]');
modal.show();
console.log('openSlotModal');
}
openSlotModal2() {
this.template.querySelector('c-generic-modal-pop-up[data-modal-id=modalPopUp1]').hide();
const modal = this.template.querySelector('c-generic-modal-pop-up[data-modal-id=modalPopUp2]');
modal.show();
}
closeAllModals() {
this.template.querySelector('c-generic-modal-pop-up[data-modal-id=modalPopUp1]').hide();
this.template.querySelector('c-generic-modal-pop-up[data-modal-id=modalPopUp2]').hide();
this.template.querySelector('c-generic-modal-pop-up[data-modal-id=modalPopUp3]').hide();
}
handleSuccess(event) {
this.accountId = event.detail.id;
const evt = new ShowToastEvent({
title: 'Account created',
message: 'Record ID: ' + event.detail.id,
variant: 'success',
});
this.dispatchEvent(evt);
this.template.querySelector('c-generic-modal-pop-up[data-modal-id=modalPopUp2]').hide();
const modal = this.template.querySelector('c-generic-modal-pop-up[data-modal-id=modalPopUp3]');
modal.show();
}
}
<?xml version="1.0" encoding="UTF-8"?>
<LightningComponentBundle xmlns="http://soap.sforce.com/2006/04/metadata">
<apiVersion>54.0</apiVersion>
<isExposed>true</isExposed>
<masterLabel>Reuse Modal</masterLabel>
<targets>
<target>lightning__AppPage</target>
<target>lightning__HomePage</target>
<target>lightning__RecordPage</target>
</targets>
</LightningComponentBundle>
Generic Modal Pop up Component code
genericModalPopUp.html
<template>
<template if:true={showModal}>
<section role="dialog" tabindex="-1" aria-labelledby="modal-heading-01" aria-modal="true"
aria-describedby="modal-content-id-1" class="slds-modal slds-fade-in-open">
<div class="slds-modal__container">
<header class="slds-modal__header">
<lightning-button-icon class="slds-modal__close" title="Close" icon-name="utility:close"
icon-class="slds-button_icon-inverse" onclick={handleCloseModal}></lightning-button-icon>
<h2 class="slds-text-heading_medium slds-hyphenate header-slot">
<slot name="header"></slot>
</h2>
<p class="slds-m-top_x-small modal-hidden">
<slot name="tagline" onslotchange={handleSlotTaglineChange}></slot>
</p>
</header>
<div class="slds-modal__content slds-p-around_medium" id="modal-content-id-1">
<slot name="content" onslotchange={handleSlotContentChange}></slot>
</div>
<footer class="slds-modal__footer modal-hidden">
<slot name="footer" onslotchange={handleSlotFooterChange}></slot>
</footer>
</div>
</section>
<div class="slds-backdrop slds-backdrop_open"></div>
</template>
</template>
genericModalPopUp.js
import { LightningElement,api } from 'lwc';
export default class GenericModalPopUp extends LightningElement {
showModal;
@api show() {
console.log('show');
this.showModal = true;
}
@api hide() {
this.showModal = false;
}
handleCloseModal() {
//Let parent know that dialog is closed (mainly by that cross button) so it can set proper variables if needed
const closedialog = new CustomEvent('onclosemodal');
this.dispatchEvent(closedialog);
this.hide();
}
}
<?xml version="1.0" encoding="UTF-8"?>
<LightningComponentBundle xmlns="http://soap.sforce.com/2006/04/metadata">
<apiVersion>54.0</apiVersion>
<isExposed>false</isExposed>
</LightningComponentBundle>
So this is how we can create a reusable component using Slots and passing a markup .
DEMO:
Source code :- Git Hub
Resources:
Salesforce Documents -Slots
lwc-recipes
Thank you all !
#Keep learning #Keep Sharing :)
Recent blogs:
How to use hyperlink in custom Toast Notification message in LWC
Nested Accordion in LWC
Build custom add to favorites functionality using LWC
How to update Field Level Security in bulk ?
Comments
Post a Comment